
Understanding the Exposure Triangle in Photography
Photography is both an art and a science. As much as it relies on the photographer's creative vision, it also depends heavily on technical knowledge. One of the most fundamental concepts in photography is the exposure triangle. Mastering this concept is crucial for anyone who wants to take control of their camera and produce consistently high-quality images. The exposure triangle consists of three main components: aperture, shutter speed, and ISO. Understanding how these three elements interact with each other can significantly impact your ability to capture the perfect shot.

The Exposure Triangle: An Overview
The exposure triangle is a visual representation of the relationship between aperture, shutter speed, and ISO. Each side of the triangle represents one of these three elements. When combined, they determine the exposure of an image, which is how light or dark the image appears. Achieving the right exposure is key to creating well-balanced photographs.
Aperture
This is the setting to focus on if depth of field is your most important artistic outcome. Aperture refers to the size of the opening in the lens through which light enters the camera. It is measured in f-stops, such as f/2.8, f/4, f/5.6, f/8, f/11, and so on. A smaller f-stop number (e.g., f/2.8) indicates a larger aperture, allowing more light to enter the camera. Conversely, a larger f-stop number (e.g., f/11) indicates a smaller aperture, allowing less light to enter.
The aperture not only affects the exposure but also influences the depth of field, which is the area of the image that appears in focus. A larger aperture (smaller f-stop) results in a shallow depth of field, creating a blurred background and foreground while keeping the subject in sharp focus. This effect is often used in portrait photography to isolate the subject from the background. On the other hand, a smaller aperture (larger f-stop) increases the depth of field, making more of the scene appear in focus, which is ideal for landscape photography.

Aperture F/Stop
In this image a high shutter speed was used to stop any motion, but also the F/Stop was low at around f/2.8 to keep the main subject in focus but to blur out the people in the background. The ISO was auto but remained low due to sufficient light in the scene.
Shutter Speed
This is the setting to focus on if you want to stop motion blur or increase motion blur. Shutter speed refers to the amount of time the camera's shutter is open, allowing light to hit the sensor. It is measured in seconds or fractions of a second, such as 1/1000, 1/500, 1/250, 1/60, 1/30, and so on. A faster shutter speed (e.g., 1/1000) means the shutter is open for a shorter duration, which reduces the amount of light entering the camera. A slower shutter speed (e.g., 1/30) means the shutter is open for a longer duration, allowing more light to enter.
Shutter speed not only affects the exposure but also influences the motion in the image. A fast shutter speed (1/2500th of a Second) can freeze motion, making it ideal for capturing fast-moving subjects like sports events or wildlife. A slow shutter speed (1/5th of a second) can create a sense of motion blur, which can be used artistically to convey movement, such as in long-exposure shots (of a second or more) to achieve flowing water or light trails from cars at night.
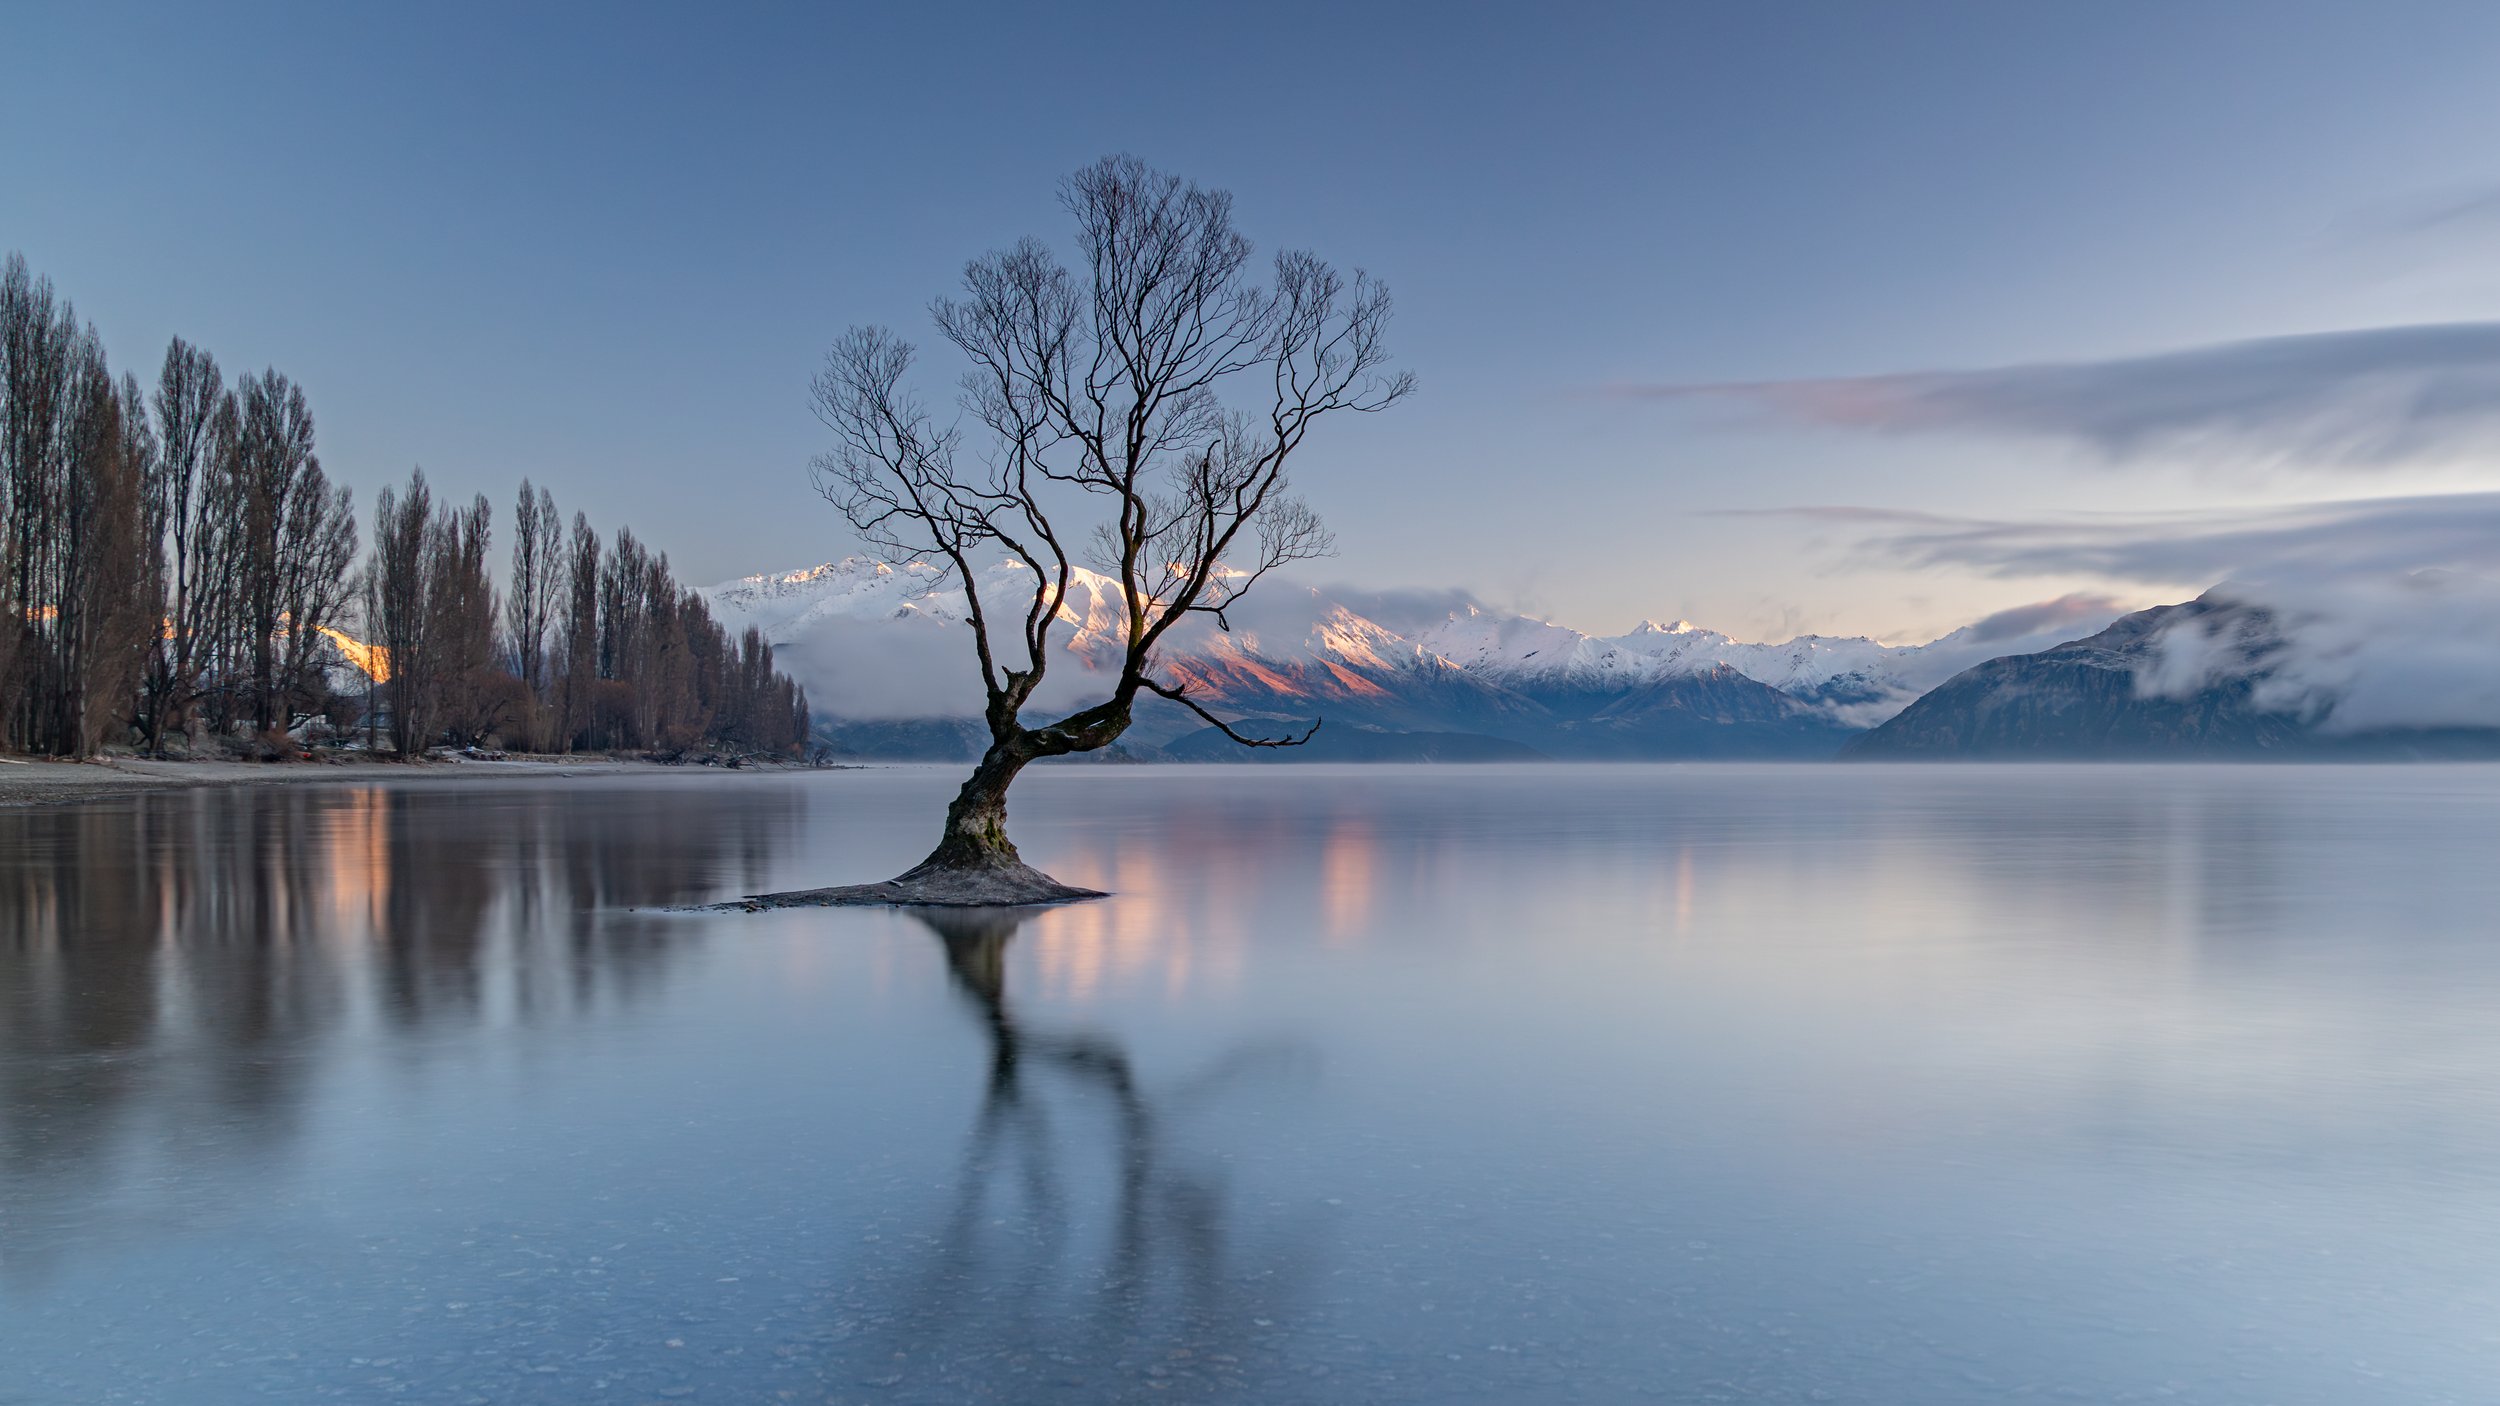
Long Shutter Speed
In this image ND filters were used, ISO was very low, F/stop was mid to high, all to reduce the light on the sensor. This allowed a LONG SHUTTER SPEED of 20 seconds which could be used to blur the water until it had that smooth effect. You must also keep the camera on a tripod and very still during the exposure.
ISO
This is the setting to focus on if less noise is your goal - but also if you need to add more light to enable other settings. ISO measures the sensitivity of the camera's sensor to light. A lower ISO value (e.g., ISO 100) indicates lower sensitivity, requiring more light to achieve proper exposure. A higher ISO value (e.g., ISO 1600) indicates higher sensitivity, requiring less light to achieve the same exposure.
While increasing ISO allows for shooting in low-light conditions, it comes with a trade-off: higher ISO values can introduce digital noise or grain into the image, reducing its overall quality. Therefore, we often hear that we must use the lowest ISO setting to achieve the desired exposure to maintain image clarity and detail. In reality, most modern cameras ISO can be set much higher and still not get noise that will impact your image. It is often set to auto (with a auto - MAX) and leaving you to focus on the other more important settings such as Aperture and Shutter Speed which offer more artistic options.
Balancing the Triangle
Achieving the right exposure involves balancing the three elements of the exposure triangle. Adjusting one component requires compensating with the others to maintain the desired exposure. This interplay is crucial for achieving different creative effects and adapting to various shooting conditions.
Practical Examples
Portrait Photography: In portrait photography, you might want a shallow depth of field to make the subject stand out. To achieve this, you would use a large aperture (e.g., f/2.8). However, using a large aperture allows more light to enter the camera, potentially overexposing the image. To compensate, you can use a faster shutter speed and a lower ISO.
Landscape Photography: For landscape photography, you generally want a large depth of field to keep the entire scene in focus. This requires a small aperture (e.g., f/11). A smaller aperture lets in less light, so to achieve proper exposure, you might need a slower shutter speed and possibly a higher ISO, depending on the lighting conditions.
Action Photography: When capturing fast-moving subjects, such as in sports photography, a fast shutter speed (e.g., 1/1000) is necessary to freeze the motion. A fast shutter speed reduces the amount of light entering the camera, so you might need to use a larger aperture and a higher ISO to maintain proper exposure.
Low-Light Photography: In low-light conditions, such as night photography, you might need to increase the ISO to make the sensor more sensitive to light. However, to minimize noise, you should try to keep the ISO as low as possible and use a slower shutter speed and a larger aperture to let in more light.
Tips for Mastering the Exposure Triangle
Understand Your Camera: Familiarize yourself with your camera's settings and controls. Knowing how to quickly adjust aperture, shutter speed, and ISO will help you respond to changing lighting conditions and capture the shot you envision.
Use Manual Mode: While automatic modes can be convenient, shooting in manual mode gives you full control over the exposure triangle. This allows you to make precise adjustments and understand how each component affects your images.
Practice in Different Lighting Conditions: Experiment with different combinations of aperture, shutter speed, and ISO in various lighting conditions. This hands-on practice will help you develop an intuitive understanding of how to balance the exposure triangle.
Bracket Your Shots: Bracketing involves taking multiple shots of the same scene at different exposures. This technique can be useful in challenging lighting situations where getting the perfect exposure in one shot is difficult. It also helps you learn how different settings affect your images.
Use Exposure Compensation: Many cameras have an exposure compensation feature that allows you to adjust the exposure without changing the settings of the exposure triangle. This can be helpful for making quick adjustments in dynamic shooting situations.
Understand the Histogram: The histogram is a graphical representation of the tonal values in your image. Learning to read the histogram can help you ensure that your images are properly exposed, with a good balance of highlights, shadows, and midtones.
Experiment with Creative Techniques: Don't be afraid to experiment with creative techniques, such as long exposures, intentional camera movement, and high-key or low-key lighting. These techniques can add a unique artistic touch to your photography.

Common Challenges and Solutions
Overexposure and Underexposure
One of the most common challenges photographers face is dealing with overexposure and underexposure. Overexposure results in images that are too bright, with loss of detail in the highlights. Underexposure results in images that are too dark, with loss of detail in the shadows.
Solution: To avoid overexposure, you can use a smaller aperture, a faster shutter speed, or a lower ISO. To avoid underexposure, you can use a larger aperture, a slower shutter speed, or a higher ISO. Additionally, using exposure compensation or bracketing can help you achieve the right exposure.
Motion Blur and Camera Shake
Motion blur and camera shake can occur when using slow shutter speeds, resulting in blurry images.
Solution: To reduce motion blur, use a faster shutter speed. If you need to use a slow shutter speed (e.g., for low-light or creative effects), stabilize your camera with a tripod or use a lens with image stabilization. Additionally, you can increase the ISO or use a larger aperture to allow for a faster shutter speed.
High ISO Noise
Whilst less likely in modern cameras, high ISO noise can degrade image quality, especially in low-light conditions.
Solution: To minimize noise, use the lowest ISO setting that allows for proper exposure. If you need to increase the ISO, consider using noise reduction software in post-processing to clean up the image. Additionally, using a larger aperture and a slower shutter speed can help you achieve proper exposure without increasing the ISO too much.
Conclusion
The exposure triangle is a foundational concept in photography that every photographer should master. By understanding and balancing aperture, shutter speed, and ISO, you can take full control of your camera and create stunning images in any lighting condition. Remember, practice and experimentation are key to mastering the exposure triangle. The more you experiment with different settings and techniques, the more intuitive it will become. So grab your camera, head out, and start exploring the endless possibilities that the exposure triangle offers. Happy shooting!